Create and manage reports
Master TrueRanker reports. Learn to include GSC data, compare competitors and schedule automatic PDF emails to your clients in minutes.
Updated on
Reports are the best way to show the value of your SEO strategy. Whether you need a quick snapshot for a meeting or a fully automated monthly report for a client, this guide covers every option. Let’s go.
Click here to view a sample report.
1. Managing your reports list
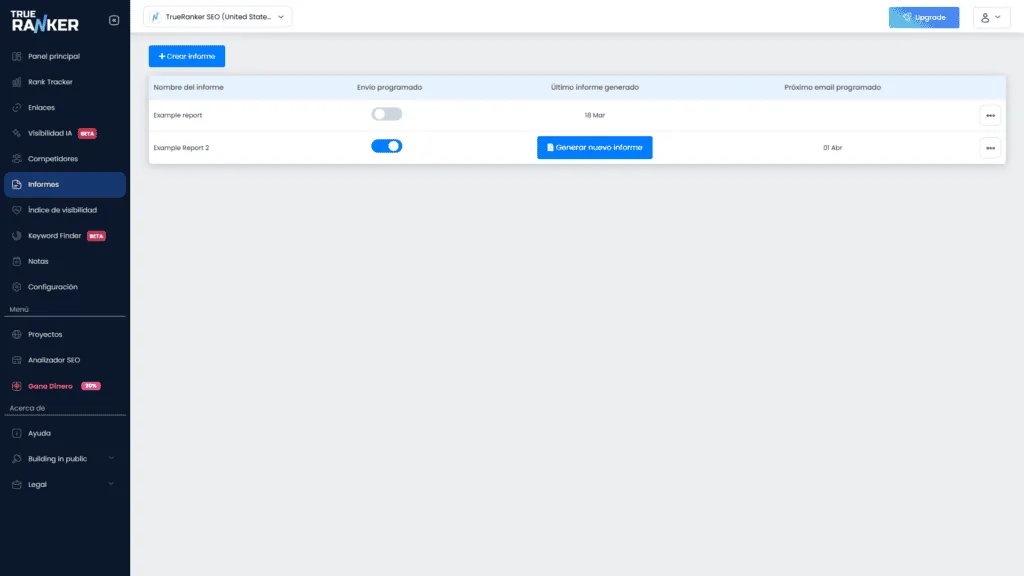
When you open the Reports section of your project, you will see your control panel:
- Report name: The custom name you assigned so you can tell your strategies apart.
- Scheduled: A quick toggle to turn automatic email delivery on or off.
- Last generated report: The date of the most recently processed data.
- Options menu (⋮): Click the three dots at the end of the row to:
- Generate new report: Run a manual update between two specific dates.
- View last generated report: Open the interactive HTML version of your data.
- Download last generated report: Save the report as a professional PDF.
- Edit/Delete: Change your filters or remove the report setup.
2. Create and edit: every field explained
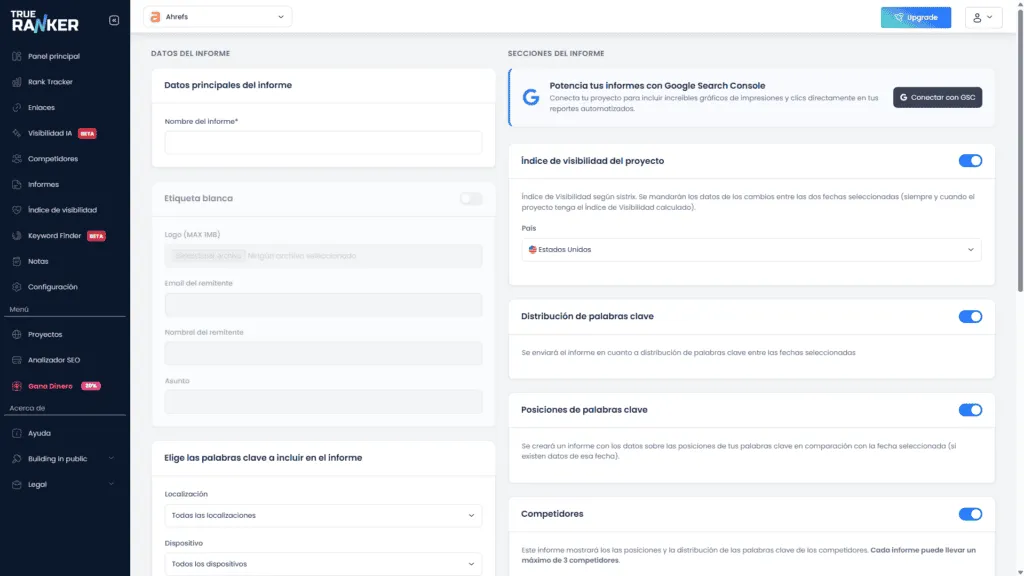
When you click “+ Create report” or “Edit report”, you will see two main columns:
A. Report data (the setup)
- Report name: Essential for your internal organisation.
- White Label:
- Company logo: Upload your agency logo (max 1MB) to brand the document.
- Sender details: Customise the sender email, sender name and subject so your clients receive the report as if it came from you.
- Keywords to include (advanced filters):
- Location: Filter by specific countries or cities you are tracking.
- Device: Select Desktop, Mobile or all devices.
- Tag: Show only the keywords that belong to a specific group or category.
- Favourites: Limit the report to your starred or most important terms.
- Ranking change: Focus on keywords that went up, went down or stayed stable.
- URL contains: Ideal for reporting on specific site sections (e.g.
/blog/).
- Schedule sending (automation):
- Frequency: Choose automatic daily, weekly or monthly sends.
- Next send date: Set the exact day the automation starts.
- Send to: Add several email addresses, separated by commas.
B. Report sections (the content) Choose exactly which modules your PDF will include:
- Visibility Index: Shows your overall organic strength in a specific country.
- Keyword distribution: A visual breakdown of your presence in the Top 3, Top 10, and so on.
- Keyword positions: The full data table, including volume, impressions and clicks.
- Competitors: Compare how your average position evolved against up to 3 rivals on a single chart.
3. Generating and exporting
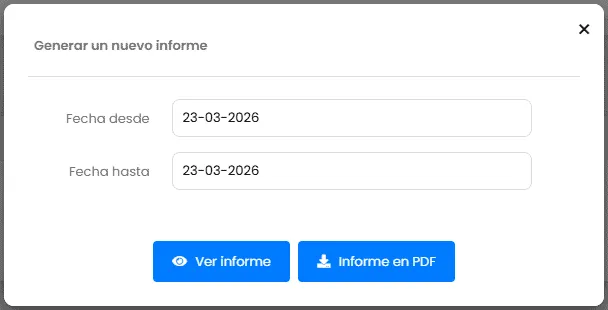
Once your setup is ready, click “Generate new report”.
- Select dates: Choose the “From” and “To” dates to compare progress.
- HTML view: A modern web panel with interactive charts and KPI blocks.
- PDF export: Optimised for a professional landscape print layout.
If you have connected your project to Google Search Console, your reports will automatically include total impressions and clicks, giving your clients a real view of their SEO traffic.
In short, these reports are built so you can show the value of your work with full transparency and professionalism. The goal is that you spend less time wrestling with the data and more time making strategic decisions that grow the business. I hope this guide helps you get the most out of every feature, from the GSC integration to competitor tracking. If you have a specific question or need a hand with your setup, reach out to our support team. We are here to help you succeed.