
One of the most important aspects that we must always take into account if we want to be successful on the Internet is SEO ranking. When positioning an online store or a blog it is important to take into account a lot of factors.
Appearing a good rank in Google search results is essential to be more successful in the business. The problem that resides in some cases is that small mistakes can condition our appearance in these search engines.
In order to avoid all these problems and have a much more optimized website, we can count on Search Console. In this article, we are going to show you how to configure Google Search Console step by step and also what it is about so that you know how it can help you. Of course, we will show you how to add your page so you can solve all these problems.
What is Google Search Console?
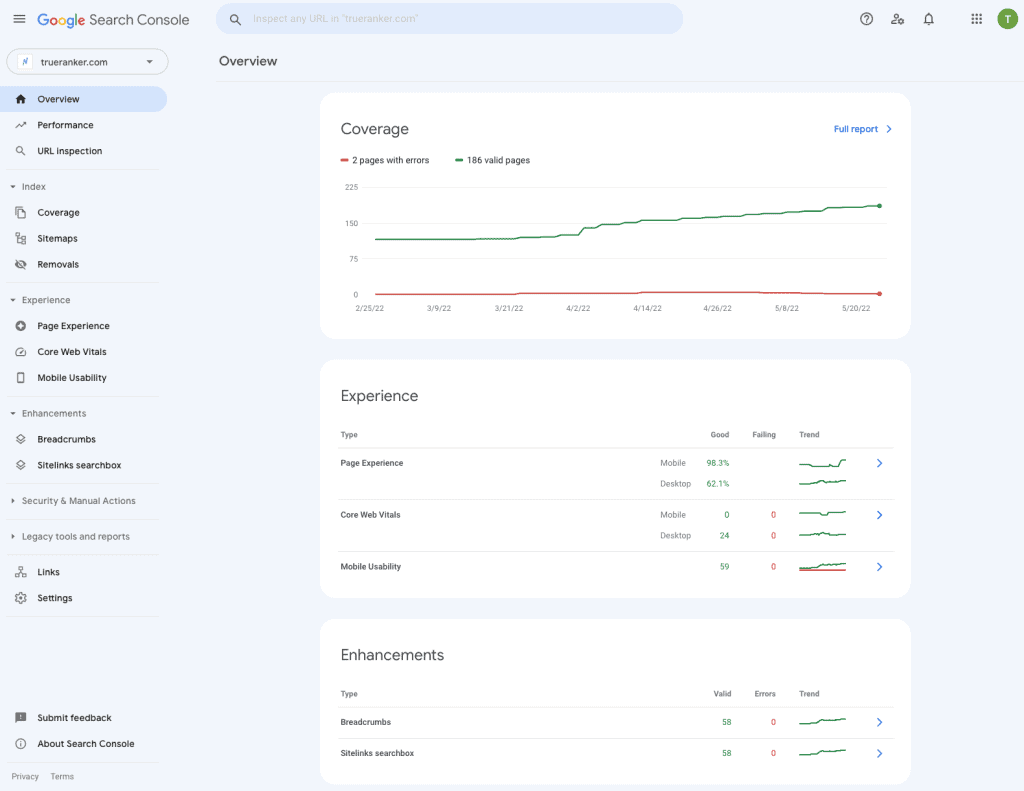
Google Search Console is a completely free Google service with which you can solve the problems of appearance in Google search engines of your website and have valuable information about the keywords that are ranking your website.
In addition to solving these problems, with Google Search Console you can constantly monitor and maintain your website for free. This way, if any incompatibility arises overtime or any problem that is affecting the appearance of your page in Google search engines, with Google Search Console you can solve it.
No registration is required to benefit from Google Search Console. However, through its purpose, you will be able to help Google understand your website much better and, therefore, improve the way it appears on the Internet.
With Google Search Console you will make it easier for Google to find and crawl your site, which is reflected in the search results. It will help you solve your website’s indexing problems and you will also receive information from those sites that have links pointing to yours.
You will be able to solve problems related to mobile usability and all kinds of functions within the search. In addition, you will also have access to SEO information. With this information, you will be able to know the terms that users search for until they reach your website or know how many times users click on a query.
In short, Google Search Console is a tool with which you can not only improve and prepare your site to have better visibility on the Internet, but you can also get valuable information with which you can better optimize your website.
How to create an account in Google Search Console?
The first thing you need to use in Google Search Console is to have a Google account. In this case, we recommend that you try to use the same account as the page itself, in case any Google service is linked to it.
If your website uses Drive, Maps or YouTube among others… we recommend that it is that same account that you sign up in Google Search Console to have everything together. Simply log into the Google Search Console tool itself once you are logged into the page and you can start the process.
Add my website to Google Search Console
For Google Search Console to be able to collect data from a page we have to tell it what our page is. Let’s see what we have to do.
The first thing to do is to log in to your Google account and enter the Google Search Console page. Once you are on the main page the platform itself is going to offer you two different options to add a property, add a domain property or add the URL prefix. Let’s look at each one separately.
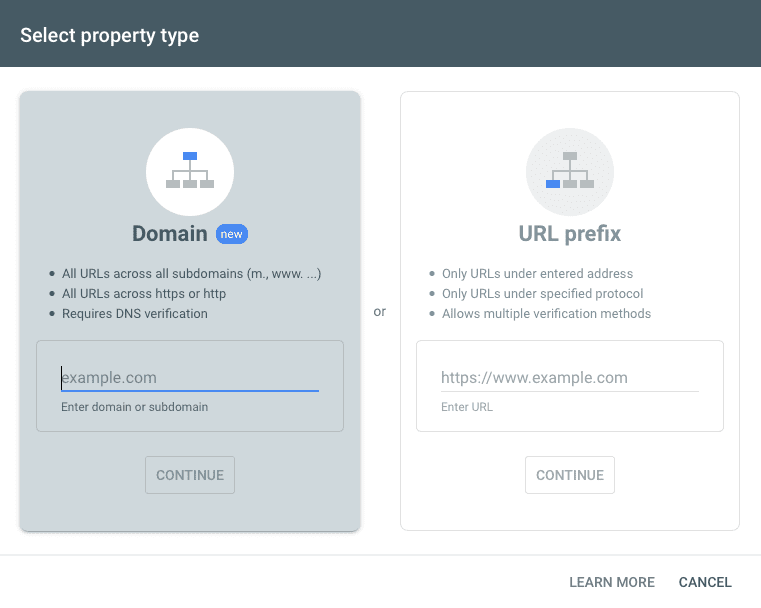
Add Domain Property
This method of adding domain ownership is relatively new, it has been working since last 2019. The only thing you have to do is to indicate the domain of the type mydomain.com and Google will do the rest of the work, that is, add all the variants that the domain itself has.
Although it may seem a very simple method, it has some drawbacks. One of the steps we have to do later is to carry out the domain verification and, in this case, if we decide to add this domain property we will have to do it through the DNS zone of our domain, something more complicated.
Add URL prefix property
Adding URL prefix property is the traditional method, i.e. the one that has always been done. In this case, you will have to specify the URL of the type https://www.midominio.com itself. This is only one of the variations of the domain, which means that you will have to add the rest of the variations by hand.
Although the previous method may be easier because Google does most of the work for you, this method is much easier to verify and can be done on the fly. Unlike the previous verification which can take up to 24 hours.
Verify the ownership of your website
Adding the page to Google Search Console is not enough. This is because, obviously, you must prove that you really are the owner of the website.
We are talking about the fact that one of the capabilities of Google Search Console is to modify and correct different technical aspects of the page, as well as to collect and offer a large amount of data.
It is logical to think that you would not want anyone to be able to do this with your page, so it is understandable that we have to verify that the page is really ours so that we can make use of this information and, of course, Google Search Console can show it to us.
The verification process can be carried out in a few different ways. Let’s see some of the alternatives you have to carry out this verification.
Verify domain ownership via DNS record
To verify domain ownership by DNS registration the first thing you have to do is to log in to your domain name provider. This can be godaddy.com, namecheap.com… whatever. If you use a CDN like Cloudflare, you will need to access the DNS zone of that domain.
Once you are logged in, the next step is to go into the DNS settings and copy the TXT record that appears at the bottom. You will recognize it because among all the text you can understand “Google-site-verification=…”. In addition, GSC offers a drop-down with the most common domain name providers to make this step easier for you.
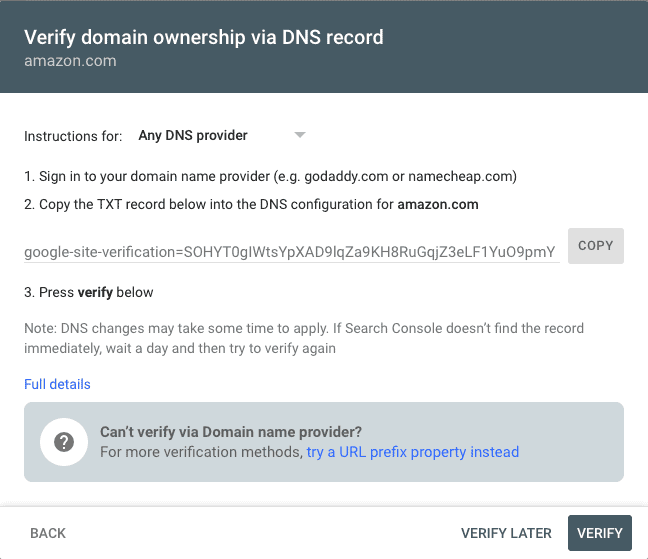
At the bottom, you will find the “Verify” option. Please note that DNS changes may take a day to be applied. If Search Console does not find the record immediately, do not worry. It usually takes a day to do so. If it doesn’t work from here, repeat the process again later.
Verify URL ownership by HTML file
The way to verify domain ownership by HTML file is one of the most used alternatives among all those offered by Google. Although it is the most popular, depending on the platform of the site it is possible that this option is not valid. However, it is usually possible.
Within the verify property section of your Search Console, you will have to choose the property you want to verify. Under “Recommended method” you will find the option to upload an HTML file.
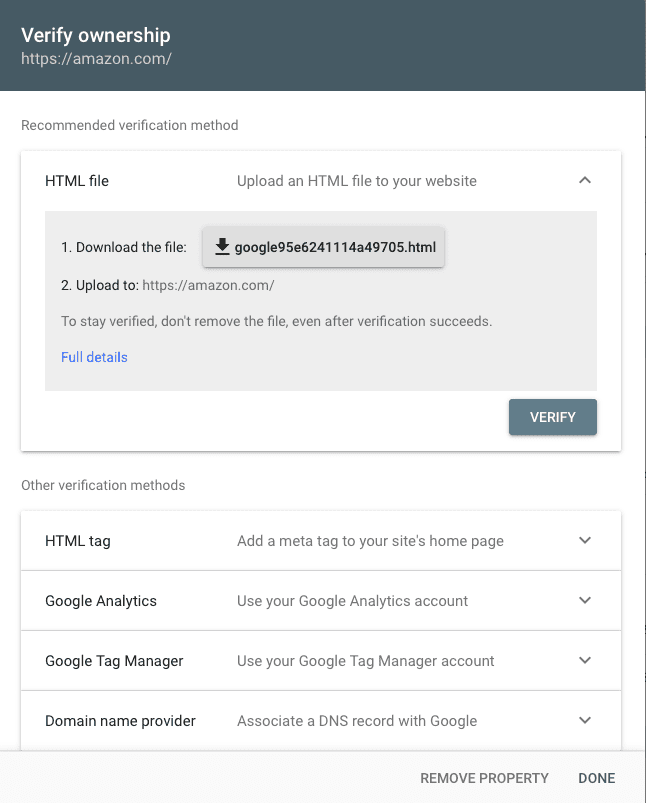
The procedure is as simple as downloading the HTML file from the verification link that will appear on the page. This file will be coded with everything that Google needs to know so that it takes into account that it is really your own page, so it can collect and display the statistics.
Once you have the HTML file all you have to do is upload it to your site. Depending on whether it is WordPress, Blogger or any other the upload procedure may be different, however, the result is the same. Once you have uploaded it within the Search Console itself you will find a link that invites you to click to see if you have really done it right.
It is important to keep the file uploaded all the time if you want the verification to be taken into account and not lost. The problem, in this case, will reside in those servers where you cannot upload a file, although it is not usually the most common. The vast majority of content management platforms support this type of file.
Other forms of verification
When you have accessed the property verification section you will have seen that there is an option with “Other forms of verification”. This is because there are viable alternatives if any of the above procedures are confusing or incompatible.
HTML tag
This method is also relatively simple to perform. However, unlike the HTML file, with the tag you will need to have access to the HTML source code of the page in question.
All you will have to do is access the code and copy the tag that appears to you from Search Console.
Google Analytics
Google Analytics is also another possibility. In the same way as in the previous section, here you will have to modify the source code of your page, in this case, in the <head> section.
If you do not have a Google Analytics account, you will have to create one. This tool is also essential to know much better your page and has updated statistics of it.
Google Tag Manager
If you have a Google Tag Manager snippet on your page that corresponds to an account on the same platform, this procedure is very simple.
If you do not have it, you will have to create it as in the previous cases. Create your account and add the snippet to your page so that it can be verified by Google.
Add your site’s Sitemap to Google Search Console
Now that you have made Google Search Console understand what your website is and have verified it, it is time to talk about the Sitemap.
To add the Sitemap of your site to Google Search Console the first thing to do is to have a Sitemap. In this case, you have two options. If you want, Google can help you to create one through the indications that it has on its own web page.
If you are looking for a more convenient option, you can download it directly from any web page that offers it for free. On the Internet, you have a lot of pages that offer this type of service, for example, xml-sitemaps.com. You only need to search a little in Google to find the page you like the most.
On the other hand, if your website is built with CMS it is important to know that there are a lot of plugins that can help you with the task of creating your Sitemap. For example, if your website is built with WordPress, one of the most recommended plugins is Google XML Sitemaps.
Once you have the Sitemap, regardless of how you got it, it’s time to upload it. To do this, go to Google Search Console and go to the “Sitemaps” section in the “Crawl” menu of the Control Panel itself.
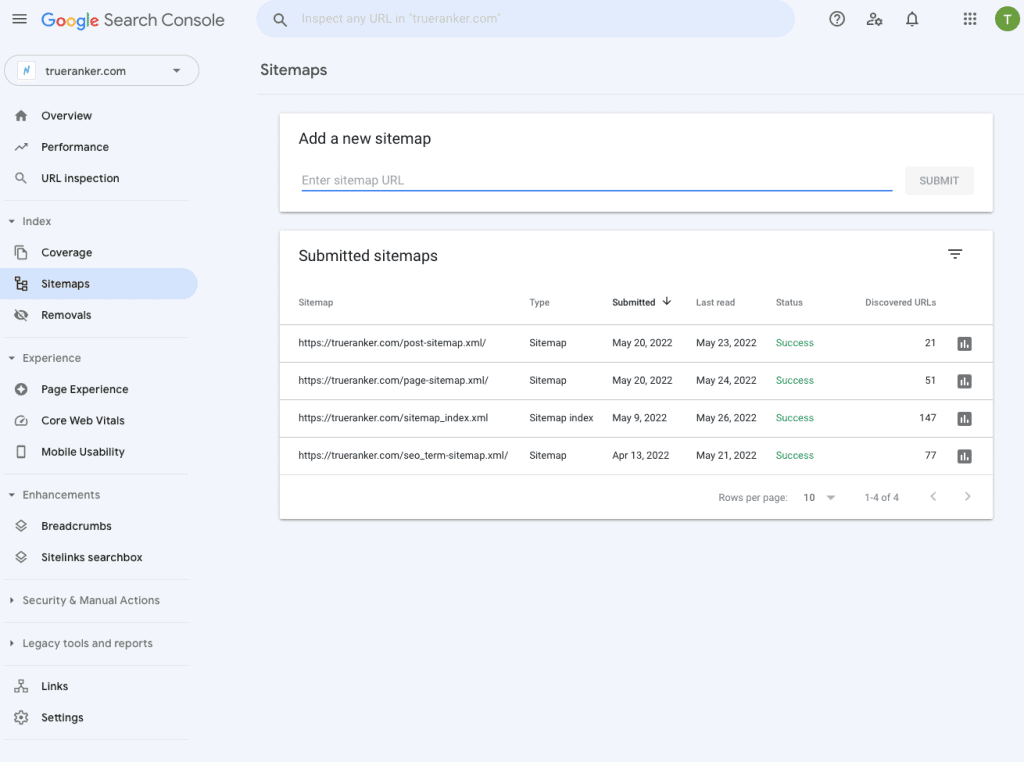
With just these steps you will be able to upload the Sitemap in a simple way as the tool itself makes the process much easier.
As with DNS verification, we recommend that you upload the Sitemap as soon as possible because Google takes time to register it. In this case, it may take up to two days before Google starts indexing it.
Once you have uploaded it and a couple of days have passed you can check if it is uploaded correctly from Google Search Console. If it gives any kind of error simply repeat the upload process again.
As you have seen in this article, the task of configuring the Google Search Console for your website is essential if you want to know about potential problems and very important SEO data about your website. The process may seem complicated, but it will only take you a few minutes to complete. If you have any questions, you can contact us to help you install GSC on your website.