
In the same way that a person takes a blood test to know their health, websites also have tools to assess their performance. If you plan to monetize your website or would like to know how well it is performing, you should consider installing Google Analytics on your site.
In this article, we will teach you everything you need to know about Google Analytics, from what you need to know, to how to install it. We will guide you step by step through the process of installing it on your website with ease so that you can better understand the performance of your website with complete ease.
What is Google Analytics?
Google Analytics is a tool developed by Google whose purpose is to measure and analyze everything that happens on a website or mobile application.
One of the advantages of Google Analytics is that it has a completely free version. This version is used by millions of users around the world and, if you need access to more complex functions, it also has a commercial variant called Google Analytics 360.
The truth is that in the vast majority of cases it is more than enough with the standard version of Google Analytics, which is the one we are going to see in this article. Don’t be misled into thinking that a tool with free options is simple because with Google Analytics you will have a large amount of information at your disposal.
What data can you get with Google Analytics?
Thanks to this tool we can get to know our audience better. This is because we can know at what time of the day they connect, if they are men or women, the age range, the content they have searched to reach our page, from where they link to our page…
With Google Analytics you will probably get more information than you will be able to handle. This tool is essential to knowing the number of unique users, the bounce rate, the average duration of the sessions…
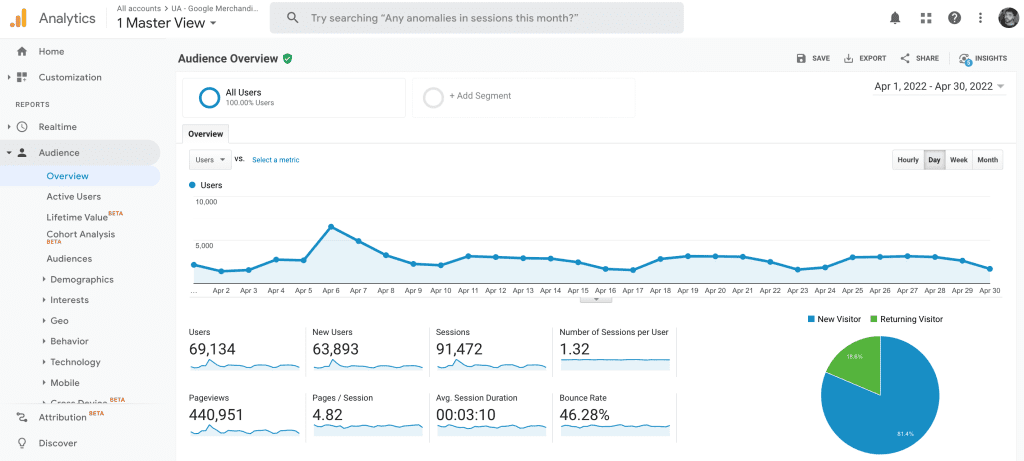
Thanks to all these metrics we can know the status of our page. Know if it has more or fewer views than last month, assess how marketing campaigns are working or also know those aspects that we should improve.
Like everything in life, Google Analytics is changing and evolving over time. In this sense, we have two versions of Analytics, Universal Analytics (UA) and Google Analytics 4 (GA4). Let’s get to know them better to see the differences.
Universal Analytics (UA)
Universal Analytics is a form of Google Analytics measurement that we could say is already part of the past. Although it has been widely used by a large number of users, the truth is that its days are numbered.
Universal Analytics will cease operations in July 2023
This is because Universal Analytics will stop working next July 2023. As of today, there is still more than a year to go, however, it is important to begin to appreciate that this is a form of measurement that will soon become obsolete so it is important to begin to value the change.
Google Analytics 4 (GA4)
That change is Google Analytics 4. The main difference between Google Analytics 4 and Universal Analytics is that Universal Analytics focuses more on page views while Google Analytics 4 focuses more on the campaigns or actions (events) in particular that take place within the website itself.
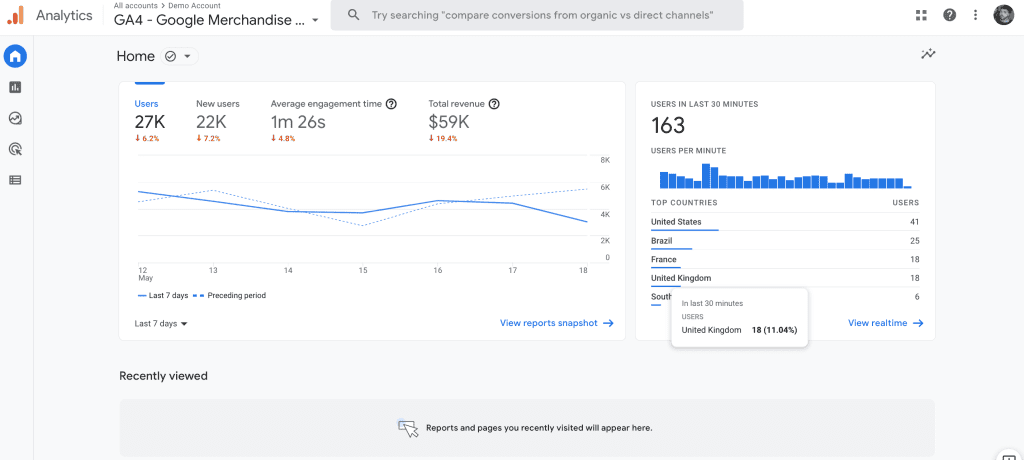
Thanks to this new way of measuring we can know much better the impact of our campaign in terms of user interaction. In addition, Google Analytics 4 offers other advantages such as being able to unify the metrics between a mobile application and website as well as social networks.
Which version of Google Analytics should you install on your website?
This is an important decision to make and one that many users are still wondering about. From here we believe that it is a good option to install both versions.
First of all, Universal Analytics is quite easy to use, so it is especially attractive for those users who are going to run their first website. Also, there’s a lot more data and, well, it’s really still used a lot.
On the other hand, it’s important not to lose sight of the future. Installing Google Analytics 4 will allow you to collect data to be able to better analyze your campaigns. Although Google Analytics 4 is still in its infancy, the truth is that due to the artificial intelligence it uses, it learns very quickly.
Today, Google’s recommendation is to have both versions, Universal Analytics to avoid losing data on the website and Google Analytics 4 to collect data and let the artificial intelligence work.
Installing Google Analytics (UA) step by step
- The first thing you should do is to create an Analytics account. Creating an account is simple, just access the “Manage” section, go to the “Account” column and click on “Create account”.
- The next step is to assign a name to the property. You will reach this section after you have created your account and it will basically serve to configure options such as the type of currency and the time zone where it is located.
- To continue you must click on “Show advanced options” which is located at the bottom of the property configuration. At this point activate the switch that says “Create a Universal Analytics property” and enter the web page where you are going to place it.
- Here you will be given the option to create a normal Analytics account, which will be the one we will stay with or the Analytics 4. Select the account you want, hit continue and click “Create”.
- With the account already created and configured, the next step is to add its tag to the website. Here the procedure will be different depending on whether we are going to add it to a website that is hosted on a CMS, for example, WordPress or on a normal web page.
- For the CMS website what you should do is look for the “Global website tag (gtag.js)”. Copy and paste in that part all the custom tags that your Google Analytics account has with the add HTML function and you are done.
- In the case of a website, it is similar. You will have to look for the global tag in the same way, but here you will have to paste the tag after the <head> tag of your web page.
The data collection may take about 30 minutes to start. We recommend you wait a little time and check if the process has been carried out correctly.
Installing Google Analytics 4 (GA4) step by step
When installing Google Analytics 4 on your website the procedure is similar to the previous section. The first thing you have to do is to create an account.
Follow the same steps as in the previous section. If you notice, at the end of the procedure when the account is already created and configured the page itself will tell us if we want normal Analytics or Analytics 4. In this case, it is clear that we will choose the Analytics 4 option as it is the one we want. Probably next year this option will disappear as Analytics 4 will be the only one left.
The next step is to add this Google Analytics 4 to the site to collect the data. To add it to a CMS you should go to “Manage” and, in the “Property” column, check that you have selected the new Google Analytics 4 property. Click on “Data Flows” and then on Web.
Then you should add the ID starting with “G-” that appears on the top right. The field where you will have to put this ID will vary depending on the CMS in question so you will have to look for it.
If it is a website the instructions are more general. In the same way that happens with normal Analytics, you should look for the “Global website tag (gtag.js)”. When you find it, copy and paste the custom tag that Google Analytics 4 has given you in its entirety with the add HTML function.
In the same way that happens with CMS, this will change depending on the CMS you use. It will not be the same in Blogger as in GoDaddy, however, the procedure is quite similar and you will find it through its configuration menu, it should not cost you much to find it.
Again, please note that the data collection may take about 30 minutes. Again, wait a reasonable amount of time and check if it is working.
Plugins to install Google Analytics in WordPress
Let’s see some of the most interesting plugins that exist for WordPress with which you can insert your Google Analytics code in a very simple way.
Google Analytics by Yoast
This is one of the most recommended plugins for WordPress. Behind its development is Yoast, so we can be sure of the quality of the plugin.
This plugin allows us to filter by user roles so that the visits to the page that have been caused by the administrators or authors themselves are not counted. Thanks to this advantage you will have more reliable statistics and you will have much clearer visits.
Also noteworthy is the option offered to authenticate in Google Analytics using the Google API with just a click of a button.
Google Analyticator
This plugin is developed by SumoMe and, in addition to allowing you to insert the Google Analytics code in a simple way, it also allows you to get the Analytics information in the WordPress dashboard itself.
Although it does not have as many features as other plugins, one of the advantages it has is that it is very flexible. For example, you will have no problem choosing the Analytics you prefer, either the classic or the 4.
NK Google Analytics
The main advantage that NK Google Analytics has over other plugins is the large amount of information displayed in the WordPress panel through the API.
This plugin also has the advantage of allowing you to insert the cookie warning bar and is fairly simple to configure. It is true that it is not as flexible as other plugins, but it also gives you the option to choose the Analytics you want for your page.
Simple Universal Google Analytics
As its name suggests, it is one of the simplest plugins you can find. Simple Universal Google Analytics is designed only to insert the Google Analytics tracking code.
As it hardly has different configuration options, this plugin is basically recommended for those who do not need anything else.
As you can see, installing Google Analytics on your website is a simple task that in turn will provide you with a series of data necessary to control the proper functioning of your website. Thanks to GA you will know if the actions you perform on your website have a positive or negative impact on the actions that users perform on it (your sales percentage increases, the number of visits you receive from a certain country or city increases, the bounce rate decreases, etc).
If you have any doubts or problems when installing Google Analytics on your website, you can contact us so we can help you, we will be happy to do it!